Yosemite Mac OS X system is free as a 6+ gig download so you only want to do it once and keeping a backup makes sense, here is how to make a Dual Layer Installation Boot DVD.
The terminal commands needed to do this are on:
This Blog Page
fixed1t
Friday, 30 January 2015
Terminal Commands To Create A OS X Yosemite DVD iso image
The following commands typed into the Mac Terminal Windows will create a Mac OS X Yosemite installation boot DVD iso image file that can be used to create a standalone Yosemite Installation DVD. The fixed1t YouTube video:
How To Make A Mac OS X Yosemite Installation Boot DVD
will guide you through this process and subsequent step to make the DVD from the iso image file. Here are the Terminal Commands for copying and pasting, this first command stretches of two lines, click at the end of it and drag all the way to the start of the first line before copying.
hdiutil attach /Applications/Install\ OS\ X\ Yosemite.app/Contents/SharedSupport/InstallESD.dmg -noverify -nobrowse -mountpoint /Volumes/install_app
hdiutil convert /Volumes/install_app/BaseSystem.dmg -format UDSP -o /tmp/Yosemite
hdiutil resize -size 8g /tmp/Yosemite.sparseimage
hdiutil attach /tmp/Yosemite.sparseimage -noverify -nobrowse -mountpoint /Volumes/install_build
rm /Volumes/install_build/System/Installation/Packages
cp -rp /Volumes/install_app/Packages /Volumes/install_build/System/Installation/
cp -rp /Volumes/install_app/BaseSystem.chunklist /Volumes/install_build
cp -rp /Volumes/install_app/BaseSystem.dmg /Volumes/install_build
hdiutil detach /Volumes/install_app
hdiutil detach /Volumes/install_build
hdiutil resize -size `hdiutil resize -limits /tmp/Yosemite.sparseimage | tail -n 1 | awk '{ print $1 }'`b /tmp/Yosemite.sparseimage
hdiutil convert /tmp/Yosemite.sparseimage -format UDTO -o /tmp/Yosemite
rm /tmp/Yosemite.sparseimage
mv /tmp/Yosemite.cdr ~/Desktop/Yosemite.iso
Once this is completed, a Yosemite.iso disc image file should appear on the desktop.
fixed1t
How To Make A Mac OS X Yosemite Installation Boot DVD
will guide you through this process and subsequent step to make the DVD from the iso image file. Here are the Terminal Commands for copying and pasting, this first command stretches of two lines, click at the end of it and drag all the way to the start of the first line before copying.
The Commands
hdiutil attach /Applications/Install\ OS\ X\ Yosemite.app/Contents/SharedSupport/InstallESD.dmg -noverify -nobrowse -mountpoint /Volumes/install_app
hdiutil convert /Volumes/install_app/BaseSystem.dmg -format UDSP -o /tmp/Yosemite
hdiutil resize -size 8g /tmp/Yosemite.sparseimage
hdiutil attach /tmp/Yosemite.sparseimage -noverify -nobrowse -mountpoint /Volumes/install_build
rm /Volumes/install_build/System/Installation/Packages
cp -rp /Volumes/install_app/Packages /Volumes/install_build/System/Installation/
cp -rp /Volumes/install_app/BaseSystem.chunklist /Volumes/install_build
cp -rp /Volumes/install_app/BaseSystem.dmg /Volumes/install_build
hdiutil detach /Volumes/install_app
hdiutil detach /Volumes/install_build
hdiutil resize -size `hdiutil resize -limits /tmp/Yosemite.sparseimage | tail -n 1 | awk '{ print $1 }'`b /tmp/Yosemite.sparseimage
hdiutil convert /tmp/Yosemite.sparseimage -format UDTO -o /tmp/Yosemite
rm /tmp/Yosemite.sparseimage
mv /tmp/Yosemite.cdr ~/Desktop/Yosemite.iso
Once this is completed, a Yosemite.iso disc image file should appear on the desktop.
fixed1t
Wednesday, 28 January 2015
Accessing Your Personal Hidden Library Folder In Mavericks
Share With A Mac User? Watching This It Will Save Them Time And Technical Headaches.
Check out my other Mac Support tips.
fixed1t
Check out my other Mac Support tips.
fixed1t
Tuesday, 27 January 2015
Mac Microsoft Outlook Temp Folder - Retrieving A Temp File
Mac Microsoft Outlook Temp Folder - Retrieving A File Accidentally Saved Into The Outlook Temp Folder
Please give this the thumbs up if you find it useful and check out my other videos.
fixed1t
Please give this the thumbs up if you find it useful and check out my other videos.
fixed1t
Thursday, 15 January 2015
Making Apple Mavericks Home Library Directory And Files Visible
Making Apple Mavericks Home Library Directory Files Visible: Needed for Mac Google Chrome Bookmarks fix
please check out my other videos.
fixed1t
please check out my other videos.
fixed1t
Wednesday, 3 December 2014
Fixing iTunes Error - 45054 dont have enough access privileges
Hi,
One of my fixed1t software users did an update which included iTunes with a view to moving to Mavericks. He then went to open iTunes to test it out but it totally refused to work and displayed the following dialogue:
Clicking OK then brought up the following Dialogue:
He asked if I could kindly take a look into it and I have 'Another fixed1t Software Solution.
Looking at the relevant iTunes files and associated files and folders I spotted that the Users folder was missing an innocuous System Folder named Shared that needs to be present in the Users Folder.
Given that iTunes and other Applications and Processes use this folder to hold and share privileges, amongst other things, I set about to replace it.
As this is a System folder it isn't simply a matter of right clicking and adding a new folder called Shared in the Users folder. To do this, you have to do a little bit of Unix coding using the free Apple Terminal Program.
Terminal in found in the Utilities folder which is within the Applications folder:

Open the terminal window and type in the following Unix command mkdir to make a new Directory Folder within the Users folder and press Return:
sudo mkdir -p /Users/Shared/

If you have the Users folder open on the desktop it should now look like this:
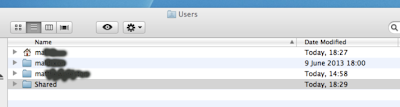
A Shared folder should now be visible. However, this isn't the end of the job. The permission on this new folder will not allow iTunes to use it. To make the folder fully accessible your use the Unix Command chmod to and set it to the folders permissions and privileges to 1777 (if your running Mac OS 10.6 as I am here). If your running Mac OS 10.5 use the code 777) These codes give the shared folder a kind of 'Universal Donor' status so it can be used by other programs and processes, sort of permissions to all.
So at the Terminal Prompt now type:
sudo chmod 1777 /Users/Shared

After pressing Return, the job is done and you can quit the Terminal.
When you go back to the Applications Folder and open iTunes it should now spring back into life with the errors gone, it worked for me.

As with all system fixes, it would be advisable to logout and log back in again to see if it still works. If it doesn't rebuild and fix the disc permissions.
I'll do another blog about that shortly.
If you a Garageband User check out my converter and sample/loop extractor videos on youtube.
http://www.youtube.com/watch?v=1KJcFR4DKKk
If this posting was of use please leave a comment and give it the thumbs up.
Thanks fixed1t
One of my fixed1t software users did an update which included iTunes with a view to moving to Mavericks. He then went to open iTunes to test it out but it totally refused to work and displayed the following dialogue:
 |
| You do not have enough access privileges for this operation |
 |
| An unknown error occurred (-45054) |
Looking at the relevant iTunes files and associated files and folders I spotted that the Users folder was missing an innocuous System Folder named Shared that needs to be present in the Users Folder.
 |
| Screen capture of Users folder - No Shared folder is present |
Given that iTunes and other Applications and Processes use this folder to hold and share privileges, amongst other things, I set about to replace it.
As this is a System folder it isn't simply a matter of right clicking and adding a new folder called Shared in the Users folder. To do this, you have to do a little bit of Unix coding using the free Apple Terminal Program.
Terminal in found in the Utilities folder which is within the Applications folder:

Open the terminal window and type in the following Unix command mkdir to make a new Directory Folder within the Users folder and press Return:
sudo mkdir -p /Users/Shared/

If you have the Users folder open on the desktop it should now look like this:

A Shared folder should now be visible. However, this isn't the end of the job. The permission on this new folder will not allow iTunes to use it. To make the folder fully accessible your use the Unix Command chmod to and set it to the folders permissions and privileges to 1777 (if your running Mac OS 10.6 as I am here). If your running Mac OS 10.5 use the code 777) These codes give the shared folder a kind of 'Universal Donor' status so it can be used by other programs and processes, sort of permissions to all.
So at the Terminal Prompt now type:
sudo chmod 1777 /Users/Shared

After pressing Return, the job is done and you can quit the Terminal.
When you go back to the Applications Folder and open iTunes it should now spring back into life with the errors gone, it worked for me.

As with all system fixes, it would be advisable to logout and log back in again to see if it still works. If it doesn't rebuild and fix the disc permissions.
I'll do another blog about that shortly.
If you a Garageband User check out my converter and sample/loop extractor videos on youtube.
http://www.youtube.com/watch?v=1KJcFR4DKKk
If this posting was of use please leave a comment and give it the thumbs up.
Thanks fixed1t
Tuesday, 4 November 2014
Fixing Mac Startup Hang And Crashes Caused By Adobe Creative Cloud
Has Your Mac Started locking up at Startup?
Subscribe to:
Posts (Atom)